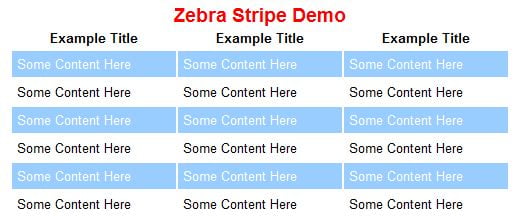
Looking for an easy way to create that striped look for your tables? Plus, add a little excitement with some hover effects? Well, here’s a quick example of how easy that is to do with a bit of CSS, HTML and good ‘ol JQuery!
For the purposes of this tutorial we’re using some very basic methods of table creation, CSS and very simple JQuery methods to accomplish our goals. What we will be doing is adding a stripe to every other row and then adding a hover effect to the others. This tutorial is only designed to show you how these actions can be implemented. You can redo the CSS and table layout any way you wish.
The HTML
Let’s start with a basic table. But, for our purposes, we are using all the necessary table tags like tbody, tfoot and theadso we can further isolate exactly what rows we want to have striped. This makes it easier for JQuery to differentiate between those rows in the area that you may wish to be excluded.
| Example Title | Example Title | Example Title |
|---|---|---|
| Some Content Here | Some Content Here | Some Content Here |
| Some Content Here | Some Content Here | Some Content Here |
| Some Content Here | Some Content Here | Some Content Here |
| Some Content Here | Some Content Here | Some Content Here |
| Some Content Here | Some Content Here | Some Content Here |
| Some Content Here | Some Content Here | Some Content Here |
Notice that I gave the table an ID of ‘zebra’. This is so you can specify this particular table in the event you have others on your page or even on other pages since JQuery will apply its magic to any table unless specified.
The CSS
This is pretty simple and the body styling is just for the demo purposes and not necessary for the JQuery to do its thing.
body { 	font-family: Arial; font-size: 10pt; }

.zebra { 	background-color: #9CF; 	color: #fff; }

caption { 	font-weight: bold; color: #ff0000; font-size: 14pt; }

#zebra td { padding: 5px; }

.grey { background-color: #ddd; }
The JQuery Code
And, finally, the JQuery code that identifies the table ID, sorts through the elements to identify just those that we wish to apply the changes to, and works its magic. I’ll explain below.
JQuery works off the ID and class names of your elements and CSS. So let’s walk through it. First, we’ve asked it to identify the even table rows bu only inside the tabled with the ID of zebra and only the ones within the tbody tag. This excludes the thead area in case you wish to format that differently than the rest. What we want to do is add a CSS ‘class’ to those even rows. Using JQuery’s addClass function alllows us to do just that. The result is the even rows ONLY within the
tag have the blue background applied. The odd rows remain untouched.
Now we thought it would be fun to add a hover effect to the other rows. For this we add a function that sorts through the ODD rows and uses the mouseover JQuery function and the addClass function to accomplish. Now, keeping in mind that this works on the mouseover, we need to add a mouseout function to return it to normal. Otherwise the mouseover effect will be permanent, the background will remain grey. A true hover effect would change the color then return it to normal after the mouse leaves. So what we’ve done is simply apply the removeClass on mouseover function. Mouse on… mouse off!

0 Comments